Category

Home Improvement

Category

The average tank water heater lasts a little over a decade, and I have watched a friend kill two of them in under nine years. Both times the cause was the same thing, and it was not hard water or bad luck. It was the simple assumption that if hot water still came out of the tap, nothing needed doing.

That assumption is expensive. A tank that gets a yearly flush and a fresh anode rod can comfortably outlive its rated lifespan by years, while a neglected one starts leaking into your closet floor and drops your shower time to four minutes. I would rather spend forty minutes a year on maintenance than write a check for a new unit.

So here is the plan. You will learn the two jobs most people skip, the parts that actually wear out, and how to judge repair versus replacement without guessing.

Why Your Water Heater Fails Long Before It Dies

A tank is a steel shell lined with glass and fitted with a sacrificial rod. The rod dissolves instead of the steel, which is the whole trick. Once that rod is gone, your tank starts rusting from the inside, and by the time you see rusty hot water, the damage is already underway.

Sediment is the other quiet killer. Minerals settle on the burner plate and the tank bottom, so the flame has to heat through a layer of chalk before it reaches water. You get popping and cracking sounds, higher gas bills, and a shortened life.

According to the U.S. Department of Energy, water heating is one of the largest energy expenses in a typical American home, second only to space heating and cooling in many households. That is your money quietly going up the flue every month the tank is limed up.

Here is my honest stance: if your tank is over eight years old and you have never flushed it, do not schedule a flush. Sediment can be plugging the pinholes that would otherwise leak. Have a plumber inspect it first.

The Two Jobs Almost Nobody Does

Homeowners are pretty good about testing the temperature and pressure relief valve. They are terrible about the anode rod and the flush. Those two items are, in my experience, the entire ballgame.

Everything else on a water heater falls into one of two buckets: checks you can do in five minutes, and work that belongs to someone with the right tools. Know which bucket you are in before you start.

  • Anode rod: pull and inspect it every two to three years. Replace it when more than half the core wire is exposed.
  • Flush the tank: drain a few gallons from the bottom valve every six to twelve months to push out loose sediment.
  • Relief valve: lift the lever twice a year and confirm water flows and stops cleanly.
  • Temperature setting: keep it at 120 degrees Fahrenheit unless your dishwasher needs hotter.
  • Venting and combustion air: check that the flue is clear and the area around a gas unit is not boxed in.

Should You Repair or Replace? A Simple Test

Skip the vague advice and run two numbers instead. I call it the Half-and-Half Rule, and it has kept me from guessing on every tank I have ever owned.

The rule: if the repair quote is more than half the price of a new installed unit, or the tank is more than half its expected lifespan old, replace it. If neither is true, repair it. If only one is true, get a second opinion because you are right on the line.

A leak from the tank body itself is different. No repair fixes a rusted-through shell, and you should shut off the water and gas or power before calling anyone.

One more scenario worth naming. A homeowner in Butte with a ten-year-old gas tank, a cold shower, and a service call that quotes a thermocouple replacement for a fraction of the cost of a new unit should take the repair every time. Same homeowner with a leaking tank base and a quote near half the replacement price should not.

What the Standards Actually Require

Most people never think about why a water heater is built the way it is, and that gap matters when a plumber tells you a part is required.

Modern storage tanks are designed and tested against published safety standards. The National Institute of Standards and Technology works with standards bodies that set these technical baselines, which is why you see certain fittings on every new unit sold in the United States.

That also explains why some “optional” work is not optional. A properly sized thermal expansion tank, correct venting, and a working relief valve are code items, not upsells. If a technician skips them to save you money, find a different technician.

Flushing Your Tank: A Fifteen Minute Walkthrough

Want to do the annual flush yourself? It is a genuinely easy job, and here is how I do it.

  1. Shut off power at the breaker, or set a gas unit to pilot.
  2. Close the cold water inlet valve on top of the tank.
  3. Attach a garden hose to the drain valve and run it outside or to a floor drain.
  4. Open a hot water faucet somewhere in the house to let air in.
  5. Open the drain valve and let it run until the water clears.
  6. Close the drain, close the faucet, reopen the inlet, then restore power.

If the drain valve clogs on the first try, that is your sediment telling you the tank has been ignored for years. Stop and get help rather than forcing it.

When to Call a Plumber

Do the easy stuff yourself. Call a professional the moment you see water pooling, smell gas, or hear the tank rumbling like a kettle. Those are not maintenance problems, they are repair calls, and guessing at them is how small jobs turn into flooded floors.

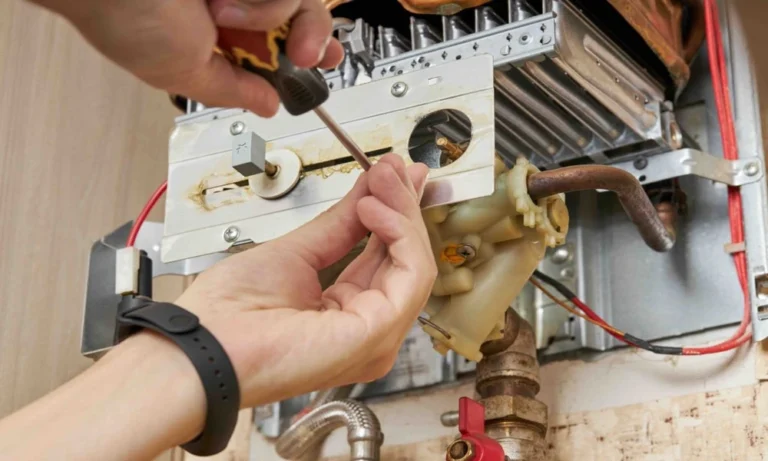
Here is the part I am opinionated about. For anything beyond a flush and an anode swap, I would rather hand it to someone with the tools, the parts, and the warranty behind the work. Around here that means hiring water heater repair services in Butte, MT rather than improvising with a wrench and a video at eleven at night.

The Environmental Protection Agency notes that energy efficiency programs exist precisely because home systems perform better when they are maintained to spec, and a water heater is no exception. A technician with a combustion analyzer and a proper flush pump catches things a homeowner cannot.

So run the Half-and-Half Rule, keep an eye on that anode rod, and stop treating “the water is still hot” as proof that nothing is wrong. Your shower, your energy bill, and your closet floor will all thank you. What is the last time you actually checked your tank?
For decades, residential roofing decisions were largely driven by familiar materials, basic code compliance, and the expectation that the outer roof covering would handle most weather exposure. Asphalt shingles, felt underlayment, plywood or oriented strand board decking, and standard fastening patterns formed a system that worked reasonably well under ordinary conditions. Severe wind events, however, repeatedly exposed weaknesses that were not always obvious during normal service.

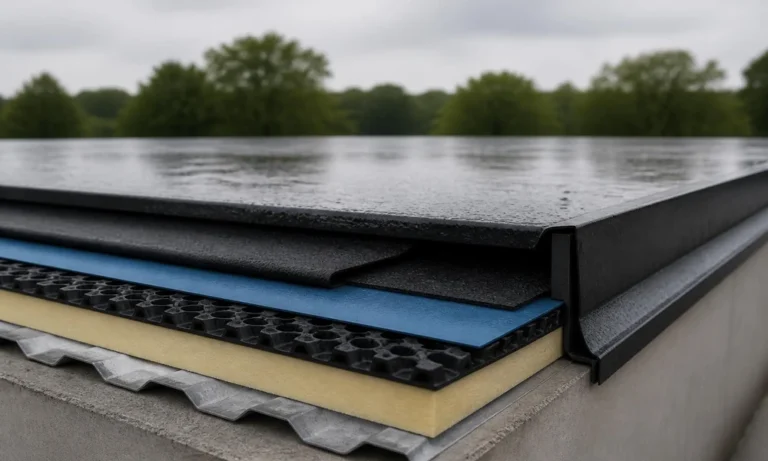
Modern roofing takes a more layered approach. Instead of treating shingles or panels as the roof’s primary defense, newer standards increasingly consider how the covering, fasteners, deck, underlayment, edges, flashing, and water barriers perform together. Research into wind uplift and wind-driven rain has also influenced building codes and installation practices, particularly in regions exposed to hurricanes and strong thunderstorms.

What Did Older Roofing Standards Expect From the Roof?

Roof covering: Traditionally, shingles, tiles, or metal panels received most of the attention because they formed the visible weather surface. If the covering appeared intact, the roof was often considered adequately protected. Modern testing has shown that losing even part of the covering can start a sequence that exposes underlayment and decking to wind and water.

Smooth-shank fastening: Older roof assemblies frequently relied on conventional smooth nails and fastening schedules that were acceptable under previous codes. Today’s high-wind construction may call for stronger attachment patterns and fasteners with greater withdrawal resistance. The Insurance Institute for Business & Home Safety describes its FORTIFIED approach as using ring-shank nails, tighter deck-nailing patterns, sealed roof decks, and reinforced roof-edge details to improve resilience.

Felt underlayment: Asphalt-saturated felt was long the standard secondary layer beneath shingles. It remains useful and is still permitted in many assemblies, but modern roofing offers additional underlayment options and more demanding installation requirements in certain conditions.

Minimum protection: Earlier codes often focused primarily on preventing structural failure under prescribed conditions. Newer standards increasingly address what happens after part of the roof covering is damaged. That distinction is important because a building can remain structurally standing while water entering through the roof causes significant interior damage.

Property owners comparing repair, replacement, restoration, gutter, siding, or storm-damage work can also use a contractor such as HK Construction to evaluate how the visible roof relates to the rest of the exterior system. Its services include roof repair and replacement, commercial roofing, gutters, siding, restoration, painting, decks, fences, and assistance with insurance claims. Looking at those components together can be particularly useful after wind or hail damage, when the condition of roof edges, drainage components, siding, and related exterior surfaces may influence the appropriate scope of work.

How Has Wind Resistance Become More Precise?

Wind rating: A shingle’s wind rating is no longer simply interpreted as a promise that the roof will survive a storm of the same advertised speed. Roofing products are evaluated using standardized test procedures that examine specific modes of failure.

For example, IBHS notes that ASTM D3161 exposes shingles to fan-generated wind for a prescribed period, while ASTM D7158 evaluates both aerodynamic uplift forces and the strength of the shingle seal. These classifications help determine whether a particular product is appropriate for specific wind conditions.

Uplift resistance: Wind does not push uniformly downward on a roof. Pressure differences can create suction that attempts to lift roofing materials away from the structure. Roof corners and edges can experience particularly demanding forces, which is one reason modern design pays greater attention to fastening and perimeter details.

Roof-edge protection: Older installations sometimes treated drip edge and starter shingles as relatively minor finishing components. Current resilience research gives them greater importance because wind often begins damaging a roof at its perimeter. Better attachment at the eaves and rakes can make it harder for wind to get beneath the covering and progressively peel material away.

Shingle sealing: Asphalt shingles commonly contain factory-applied adhesive intended to bond neighboring courses together. The effectiveness of that seal depends partly on installation conditions and temperature. IBHS notes that shingles may require considerably longer to seal during cooler conditions, leaving a newly installed roof more vulnerable before adhesion develops fully.

Why Is the Roof Deck Now Part of Water Protection?

Sealed roof deck: One of the most important shifts is the idea that roof decking should remain protected even after the primary covering is damaged.

Historically, losing shingles could quickly expose underlayment and deck seams. Once water passed through those layers, insulation, ceilings, wall cavities, flooring, and personal property could be affected.

A sealed deck creates another line of defense. IBHS-backed code developments have expanded sealed-roof-deck provisions in high-wind areas, reflecting greater recognition that reducing water intrusion can be nearly as important as keeping the roof covering attached.

Deck attachment: The connection between structural panels and roof framing has also received more scrutiny. Ring-shank nails provide greater resistance to withdrawal than comparable smooth-shank nails because their ridged shanks grip the wood more aggressively. Modern resilient-roof specifications may combine those fasteners with closer spacing in vulnerable areas.

The old approach asked whether the deck was attached. The newer approach asks how strongly it is attached, what loads it must resist, and what happens if the exterior covering above it fails.

What Changed Beneath the Shingles?

Underlayment: Modern underlayment is not simply a temporary covering placed between decking and shingles. It is increasingly treated as part of the roof’s water-management system.

The National Roofing Contractors Association notes that recent building-code provisions include enhanced underlayment materials and installation methods for circumstances such as low-slope roofs and high-wind regions.

Synthetic materials: Traditional felt remains available, but synthetic underlayments have become common because they can offer favorable tear resistance, lighter weight, and easier handling. Performance still depends on product specifications, fastening, overlaps, exposure limits, and compatibility with the roof covering.

Water-barrier strategy: Modern design increasingly distinguishes between shedding ordinary rain and resisting water intrusion after storm damage. That is why taped deck seams, self-adhered membranes, properly installed underlayment, and sealed-deck methods have gained attention.

Does Newer Automatically Mean Better?

System compatibility: Not necessarily. A high-rated shingle installed incorrectly can perform worse than a more ordinary product installed according to its tested assembly. The deck thickness, nail type, fastening location, starter course, underlayment, flashing, ventilation, and edge details all influence performance.

Local requirements: Roofing standards are not identical nationwide. Climate, design wind speed, building type, roof geometry, local code adoption, and manufacturer requirements can change what is appropriate.

Existing construction: Older homes may contain decking, flashing, ventilation arrangements, or structural details that do not match current construction methods. A roof replacement can therefore involve more than removing old shingles and installing new ones.

What Does the Shift Mean for Roof Owners Today?

The biggest change is not a single new roofing material. It is the transition from viewing a roof as one weatherproof surface to viewing it as an interconnected assembly.

Older practice concentrated heavily on keeping the outer covering in place. Current standards place more emphasis on tested wind performance, stronger deck connections, secure edges, enhanced underlayment, secondary water protection, and installation details that account for predictable failure points.

That approach does not make modern roofs invulnerable. Materials still age, sealants weaken, fasteners can be installed incorrectly, and severe storms can exceed design expectations. IBHS research notes that asphalt-shingle sealant strength can decline substantially as roofs age, demonstrating why the condition of an existing roof matters alongside its original rating.

The practical difference is that today’s roofing standards increasingly ask what happens when the first layer begins to fail. By strengthening the layers underneath and the connections between them, modern systems are designed to reduce the chance that localized roof damage becomes widespread structural or interior damage.

Your home can lose 10,000 gallons of water a year to leaks, and most of that loss happens behind walls, under floors, and in crawl spaces you never see. That’s the Environmental Protection Agency’s number, and it’s the reason your water bill can creep up without a single visible drip. The good news? You don’t need a plumber’s license to catch most leaks early. You just need to know what to look for, and what to do the moment you spot it.

Here are the seven quiet clues your pipes are failing, plus the exact steps to take for each one. For the repairs you can’t handle yourself, a professional Colorado Springs pipe leak repair team can handle the messy work, but spotting the problem first is entirely on you.

Why Your Water Bill Is the Best Leak Detector You Own

Your monthly bill is the cheapest monitoring system available. But you have to read it like a detective, not a customer.

Pull your last three statements and compare the gallons used, not the dollar amount. Weather matters, so compare same-season bills. A family of four in Colorado Springs typically uses about 12,000 gallons a month. If your usage jumps 20 percent or more with no new guests, no pool fill, and no lawn watering spree, something is running or dripping that shouldn’t be.

The Environmental Protection Agency runs a whole campaign around this exact problem, and their data shows the average household’s leaks can waste more than 10,000 gallons annually. That’s enough water to wash 270 loads of laundry. epa.gov has a simple worksheet for tracking your monthly usage trends, and it takes about ten minutes to complete.

If you’re in a newer build with a smart meter, you can log in and see daily usage. A sudden nighttime spike when everyone’s asleep is a classic sign of a toilet flapper or a supply line drip.

Check the Meter Twice and Do the Math

Here’s the trick plumbers use to confirm a leak in under five minutes.

Turn off every faucet, appliance, and irrigation zone in the house. Go to your water meter, usually in a concrete box near the street, and write down the reading. Wait 30 minutes without using any water. Go back and check. If the reading changed, you have a leak somewhere in your supply lines. The only question is where.

Now, one wrinkle for Colorado Springs homeowners: your meter might be in the easement between the sidewalk and street, and the box can fill with dirt or freeze shut in winter. A flathead screwdriver and a pair of pliers usually solve both problems. If the lid won’t budge, call your utility district before forcing it, because damaging the meter housing gets expensive fast.

Once you’ve confirmed the leak, shut off your main water valve. It’s typically on the wall where the pipe enters your basement or crawl space, or in an irrigation box near the meter. Every adult in the house should know where this valve is and how to turn it. If you have to hunt for it during an active flood, you’ve already lost the race.

The Five-Minute Drip Test for Fixtures

Not every leak hides in the walls. Some of the worst ones happen right under your nose, literally. Kitchen and bathroom faucets that drip once every 30 seconds seem harmless, but they add up fast. The math is simple: a faucet dripping once per second wastes about 3,000 gallons per year. At 30 seconds between drips, you’re still looking at 500 gallons annually. That’s a lot of water for a problem you might have been ignoring since 2019.

Here’s my favorite diagnostic, the five-minute drip test. Place a dry paper towel under the faucet, the showerhead, and every visible supply line connection in your cabinets. Leave them overnight. If any towel is damp in the morning, you’ve found your leak.

For toilets, the test is different. Drop a few drops of food coloring into the tank, wait 15 minutes without flushing, and check the bowl. Color in the bowl means the flapper is worn and water is constantly seeping through. The part costs about eight dollars and takes ten minutes to replace. Most people just never check.

Stains, Sounds, and the Smell of Mildew

Your walls and ceilings tell stories, and you don’t need to be a contractor to read them. A yellow or brown water stain on drywall is the most obvious sign of a hidden leak. But look for subtler versions: paint that bubbles or peels in a single spot, wallpaper that wrinkles, or wood trim that feels soft or looks darker than the rest of the room. These all mean water is sitting somewhere it shouldn’t be, soaking into materials that aren’t designed to get wet.

Then there’s the sound test. Stand still in a quiet room for 60 seconds. Do you hear a hiss, a trickle, or a rhythmic drip? If you hear water running when every tap is off, you have a problem. This works best at night when the HVAC fan isn’t cycling and the fridge compressor isn’t kicking on.

And trust your nose. A musty, earthy smell in a room that doesn’t have a damp basement should bother you. Mold starts growing within 24 to 48 hours of water exposure, and the smell often appears before visible discoloration does. If you smell it, start looking immediately.

The Freeze-Thaw Cycle Is Your Enemy Here

Colorado Springs sits at 6,000 feet, and that changes everything about pipe risk. The climate here swings hard, with daytime highs and nighttime lows that can differ by 40 degrees in a single day during shoulder seasons.

Pipes in exterior walls, garages, and crawl spaces feel every one of those swings. The water inside expands as it freezes, and the pipe metal or plastic expands with it. When the thaw comes, the material contracts, and that’s when hairline cracks appear. The first sign is rarely a burst pipe; it’s a slow weep that stains your drywall a month later.

This is a regional reality, not a theory. The Insurance Institute for Business and Home Safety publishes detailed research on how freeze-thaw cycles damage building materials, and their data shows that the Mountain West experiences some of the most dramatic temperature swings in the country. ibhs.org has a library of studies on cold-weather home performance, and their findings on pipe insulation directly apply to homes like yours.

If your pipes run through an unheated garage or an exterior wall, consider adding foam pipe insulation before November. It costs pennies per foot and takes minutes to install. The risk isn’t just winter. A hard freeze in late September wrecks more pipes in this town than January ever does, because everyone’s still in short sleeves and nobody’s thinking about drafts.

A Practical Pre-Winter Checklist for Colorado Springs Homes

You don’t need to remodel your house to protect it. Run through this list every October, and you’ll dodge most of the expensive surprises:

  • Disconnect garden hoses and shut off exterior spigots. An attached hose traps water in the valve, and a frozen valve cracks the pipe behind it.
  • Insulate pipes in the garage, crawl space, and any exterior walls. Foam tubes with a slit down the side slip on in seconds.
  • Set your thermostat to at least 55 degrees when you travel. Keeping the house warm enough that pipes don’t freeze costs less than one burst pipe repair, and it’s not close.
  • Open cabinet doors under sinks on the coldest nights so warm house air reaches the pipes.
  • Know where your main shutoff valve is and test it once a year. Valves that sit unused for years can seize up when you finally need them.

That last one is the one I’d bet on. I’ve seen too many homeowners find their shutoff valve for the first time while water is pouring through their kitchen ceiling. Test yours now, while everything is dry and calm.

When to Call a Professional for Pipe Leak Repair

Some repairs are genuinely DIY. A dripping faucet, a worn toilet flapper, a visible pinhole leak in an accessible pipe, those are fair game.

But here’s the line: if the leak is inside a wall, under a slab, or behind a finished ceiling, you don’t have a plumbing problem. You have a demolition problem with plumbing attached. Opening drywall, cutting into concrete, and then repairing it all afterward is a skillset stack most homeowners don’t have, and the mistakes get expensive.

Professional plumbers also carry tools you’ll never buy. A pipe camera lets them see inside the line. An electronic leak detector hears water moving behind concrete. An infrared camera shows temperature differences in your walls that reveal hidden moisture. These aren’t toys; they’re the difference between a targeted repair and a guessing game that involves cutting open half your house.

The other reason to call for help early is water damage math. The longer a hidden leak runs, the more it destroys. Drywall sags, insulation compacts, framing rots, and mold spreads. The repair cost doubles every week you wait. Catching a leak in week one means replacing a patch of drywall. Catching it in month three means gutting a bathroom.

What a Professional Repair Actually Looks Like

When a plumber shows up to fix a leaking pipe, the process is more methodical than most people expect. You should know what’s coming so you can ask smart questions.

First, they locate the leak precisely. That might mean camera inspection, pressure testing, or just following the water trail from the stain. Then they shut off the water to the affected zone and open the wall or floor in the smallest area needed to access the pipe.

The repair itself depends on the pipe material. Copper sections get soldered. PEX gets a new fitting crimped on. Galvanized steel, which you’ll find in older homes, often gets replaced with modern material because patching it just delays the next failure.

Finally, a good plumber tests the repair under full water pressure before closing everything back up. You don’t find out the joint leaks three days later; that’s the whole point of testing. They’ll also check for any other weak spots in the same line while they’re in there, because fixing one leak and leaving its neighbor to blow next month is bad service.

After the work is done, the wall gets patched and repainted. Some plumbers handle this themselves. Others leave the hole for the homeowner. Ask before the work starts, because getting a drywall crew to come out for a two-foot hole is a scheduling headache you want to avoid.

Start With the Smallest Investigation You Can

You don’t need to tear your house apart to find a leak. Start with the water bill, then the meter test, then the drip test. Those three steps will catch the overwhelming majority of problems before they cause real damage.

And when you find something you can’t fix yourself, don’t sit on it. A slow leak is a gift compared to a burst pipe, because it gives you time to choose your plumber, schedule the work, and budget for the repair. A burst pipe gives you none of that.

Walk through your house tonight with a flashlight. Look under every sink, feel every exposed pipe for dampness, and listen in the quiet rooms. Ten minutes of curiosity now beats a month of repairs later. What does your water bill say about your pipes today?